

Learn Multi
platform Z80 Assembly Programming... With
Vampires!
MultiPlatform Lessons
MultiPlatform Lessons
<-
Back to the Main Contents & Basic Z80 Assembly Lessons
Introduction to the Multiplatform Series...
In this series we'll use the modules from the Platform Specific series to write programs that work on all Z80 systems, so long as we rely on the cross-platform code, we can run our program on any system, and if we want to support a new system, we just need to rewrite the common modules for that system.
where remotely possible, these functions will not use shadow registers, or IX/IY - as these may be used by the system firmware - this should maximize cross platform potential!
We're going to make a few simple CALL's we can use in our code... none of them will affect the Z80 functionality... so we can put them in our code, without changing the code's function!
So how do we use these functions? Well, we need some includes!
Lets see these functions in action!
It's not really intended you type these in, Just grab them from the Sources folder!... but there's some interesting tricks in the code that's worth us looking at!
The Modules... Simple
Monitor_BreakPoint_Show:
Monitor_PushedRegister:
Monitor_BreakPoint:
Monitor_BreakPointOnce:
The Modules... Monitor
MonitorEICheck:
Monitor:
String Reading:
String Processing:
Memory Dump:
Using the functions!
Lets test our StringReader, and Memory dump routine with a little test program... we'll read in 4 characters from the user, and dump that memory address to the screen!
String Functions
We need one more special function, it will scan this list of pointers, and return the number of the matching one, or 255 if none matched
Reading a string, and converting it to command numbers!
Room Definitions
Working with Rooms
Working with Items
How to use it
What does it do?
Key Processing
Joystick (and keycontroller) Processing
Configuring keys
Memory Data Storage and Main Loop code
Processing the Joystick - Down
Processing the Joystick - Up, Left and Right
The MainLoop
Send More Variables!
The Main Loop
Moving the CPU
Processing the Joystick
Moving the ball
Drawing the screen objects
Introduction to the Multiplatform Series...
In this series we'll use the modules from the Platform Specific series to write programs that work on all Z80 systems, so long as we rely on the cross-platform code, we can run our program on any system, and if we want to support a new system, we just need to rewrite the common modules for that system.
where remotely possible, these functions will not use shadow registers, or IX/IY - as these may be used by the system firmware - this should maximize cross platform potential!
We're going to make a few simple CALL's we can use in our code... none of them will affect the Z80 functionality... so we can put them in our code, without changing the code's function!
| Function | Purpose |
| Monitor | Show the status of all the registers |
| Monitor_PushedRegister | Push a register pair... this function will show it's contents |
| Monitor_BreakPoint | Show the program counter at this point - you can then use the emulator debugger to check the location and memory |
| Monitor_BreakPointOnce | Same as above... but this version deletes itself - designed to be put in a loop , the breakpoint will only occur once |
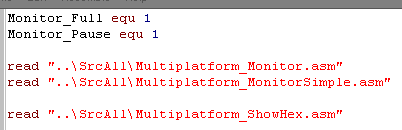
So how do we use these functions? Well, we need some includes!
| These functions require the ShowHex
function... this will show a byte as Hex chars onscreen, and not
modify any registers. The Monitor is split into two parts... the SimpleMonitor one for breakpoints and PushedRegsisters.. and the Monitor for general register viewing... you can use the simple version only when memory is limited There are also 2 extra options... Monitor_Full if defined will show all registers in the Monitor... Monitor_Pause will cause a wait for keypress |
 |
 |
The code for
this lesson is really complex... so don't try to type it in!...
See MonitorTest.ASM
for the usage example It's in the Sources.7z file archive... so just download it and use it from there... That said, it's worth knowing how it works... there's some clever tricks in there... and you'll want to know how it works, so you can customize it and make it better if you need more functionality! |
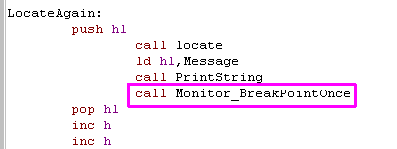
Lets see these functions in action!
| call Monitor_BreakPointOnce and
call Monitor_BreakPoint
both work the same... they will show the program
counter to the screen The Program Counter is the location in memory the code ended up when it ran, you can then check this memory location in the debugger if you want! |
   |
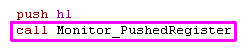
| Want to see the value of a
register?... just push it onto the stack and
Call
Monitor_PushedRegister... it will show
the value of the register pair, and take it off the
stack... so your program can continue! |
  |
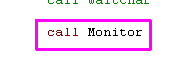
| If you really need to know
everything...use Call Monitor... it will show the state of all
Registers! if you define Monitor_Full it will show IX/IY and Shadow registers... otherwise it'll just show the basics, but use less memory! |
  |
It's not really intended you type these in, Just grab them from the Sources folder!... but there's some interesting tricks in the code that's worth us looking at!
| Need
to debug, but short on memory? remove the definition of
Monitor_Full... Still too big... well you can always just use Monitor_Simple to just show breakpoints and single register pairs! |
 |
The Modules... Simple
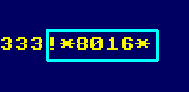
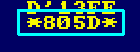
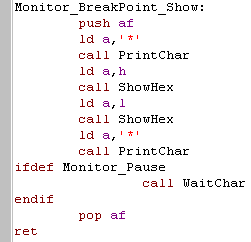
Monitor_BreakPoint_Show:
| This is not called by the user
directly, it's called by the other modules and shows HL as hex,
surrounded by ** symbols If needed it will pause the system after showing the Breakpoint or register |
 |
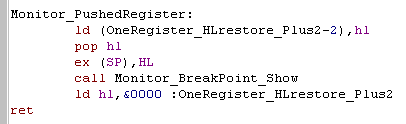
Monitor_PushedRegister:
| This module will pop a register and show it to screen... because
we need HL, but don't want to use the stack we back it up with
self modifying code... Then we pop a pair of the stack... this will be the return address... Next we swap HL with the pair on the stack... HL will now be the pair pushed before the call, and the return address will be at the top of the stack... All that's left to do is show HL... then restore HL and return to our program! |
 |
| This module is super simple! all it does is get the return address off the stack.. show it, and return! | 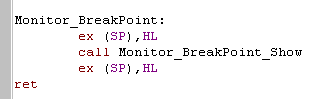 |
 |
This can help you check why your program
isn't working right! Once you know the Program Counter, you can use the emulator's internal Disassembler or memory monitor to check what's going on in the code! Maybe self-modifying code has gone wrong... or the memory is corrupted.... Knowing where in memory a command is ending up after compiling is the first stage of solving the problem! |
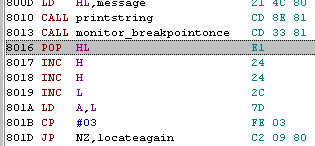
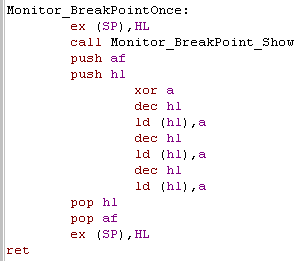
Monitor_BreakPointOnce:
| More complex than the last
version... this one overwrites the 3 bytes preceding the return
address... These will be the CALL command that called the monitor - the end result is that the monitor is only called once... so it can be used in a repeating loop to find out the program counter location (or if the loop even ran - if your program is crashing) without slowing down the program with lots of pauses. |
 |
The Modules... Monitor
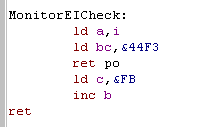
MonitorEICheck:
| Now this is a weird trick! (That won't help you lose
weight!!)... When we do LD A,I... something secret happens... the
PO flag is altered... if Interrupts were disabled,the PO will
be set! Here we use this to allow us to detect if EI or DI is set, show it to screen... and restore the interrupt state at the end of our Monitor function! in this block B is the letter 'D' or 'E' for the onscreen label... and &F3 is the DI , and &FB is EI for a self-modifying command! |
 |
| While this works
on many Z80's... some may misbehave! On the Enterprise NMOS Z80 if a firmware interrupt fires before the PO, then the flag may be changed! There is a more complex alternative to fix this below! |
 |
| on the Enterprise's NMOS Z80 ... LD A,I may not be enough! We need to check if an interrupt JUST fired... we do this by pushing &00 onto the stack... if the interrupt fired, that &00 will be replaced with &38... then we use LD A,R to check the Parity status. once we've done our check, we just need to make sure PO wasn't set by an interrupt that just fired, so we POP A and check if it's still &00.. if it isn't then an interrupt must have just fired (so Interrupts were enabled). The result is this function returns no carry (NC) if interrupts are enabled (EI)... and carry (C ) if they are disabled. |
 |
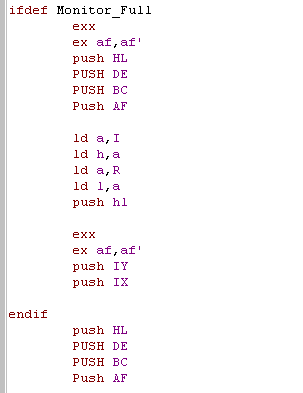
Monitor:
| The first thing we need to do is
push all the registers we're interested in onto the stack, this
also backs them up, so we don't need to worry about changing them! |
 |
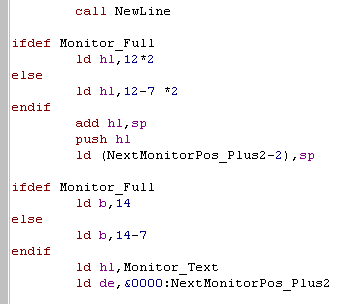
| Next we work out what the stack
pointer was before we started pushing.. and put that on the stack
too... We load DE with the address of the stack (and all the register values)... HL points to the text labels of our registers... and we use B as our counter register! |
 |
| Now we're going to show each of the
registers.. we show a 2 character label, then we display the two bytes - they're stored in Little Endian (Low-High) ... so we have to INC DE then DEC DE to show them as the user expects... We repeat this for each register we pushed! |
 |
| DI/EI were stored in a string... they have no matching byte-pair on the stack... but we need to show them anyway, so we do it here! | 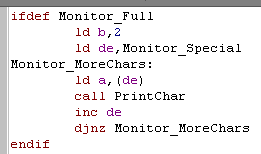 |
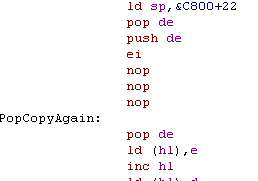
| We pushed the stack pointer onto
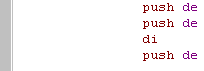
the stack - so we get rid of it with a POP HL... Next we Pause for the user if needed... Then we restore all the registers ... using two INC SP's to skip over the pushed I and R register that we don't restore. |
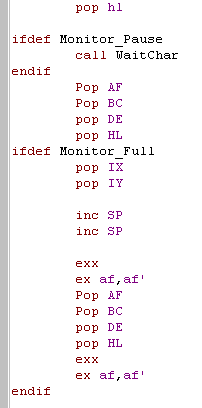 |
| Last, but not least... we restore the interrupt state... and return to the program that called us! | 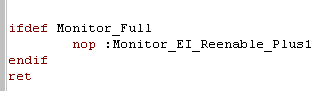 |
 |
The Monitor
covers all the Z80 basics... but you could go even further!...
Maybe we want to check the status of the memory bank mapping, or
rom paging... or perhaps we need to show the contents of the
stack, or dump some memory... Anything is possible! but of course we don't want to end up with a 'Monitor' that uses up all the ram, leaving no room for our actual program! |
String Reading:
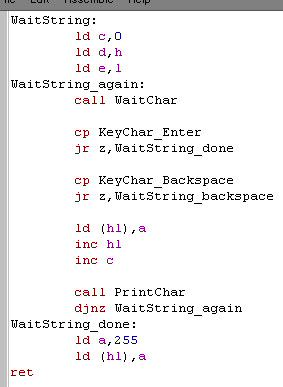
| Here is our WaitString Command, we
need to CALL it with two parameters, HL
needs to be a destination address, and B
is the maximum number of characters to read... of course the function will overwrite that many characters plus 1 (for the end of string Char 255) The function will return some useful parameters too! HL will now be the end of the string, DE will be the start... B will be the remaining unused characters... and C will be the number of characters entered! How's it work? pretty simple! DE is used to back up the start of the string - we need that for later! Each character is read in, and if it's not DELETE or ENTER key, we store it in the string, and repeat if B is still >0 When we're done, we store a 255 as the last character in the string. |
 |
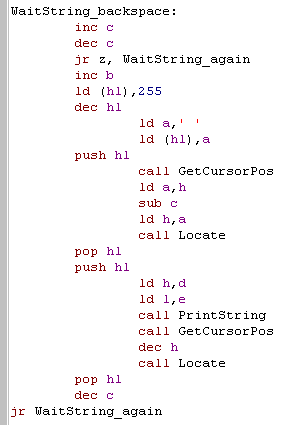
| Now we need to handle the backspace
key! First we need to check if any keys were pressed, we could do LD A,C then OR A... but lets try a different trick! By doing INC C... DEC C... we can set the Zero flag in the same way, but leave A untouched - a trick worth bearing in mind! If the keycount is zero, we give up - there's nothing to delete! otherwise we INC B - set the last character to a space (to delete the one onscreen! next we get the current cursor position, subtract the length of the string from the Xpos in H, and redraw it (with the new space at the end)... the line will be redrawn Finally we DECrease the key count in C and return back to wait for more keys! |
 |
|
These examples all use 255 as the
end-of-string byte... while 0 is more common in many examples,
this was used as an end-of-message command by ChibiAkumas Some examples even add 128 (&80) to the last character in the string, to save a byte from the string length, but this causes problems for character sets that need more than A-Z in their alphabet |
String Processing:
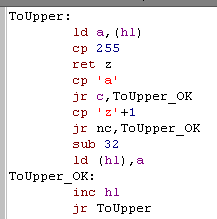
| We're going to create a String to
Hex processor soon, but we're going to assume all the characters
are uppercase, So lets create a ToUpper function that will do that for us, it's pretty simple! we process all the characters in the string until we get to a char 255... if a character is between 'a' and 'z' then we add 32 to it, which will convert it to 'A'-'Z' |
 |
| This function will take a pair of
characters from HL,
convert them from HEX, and return them as a byte in A We use the function AsciiToHex to convert as single character, then we do 4 RLCA's to move the bottom nibble to the top, and back it up in B Then we run AsciiToHex again to get the second character, and OR the top nibble in B in... we're done now, so we just return! AsciiToHex reads in a character from HL, we subtract the character '0' to convert the numbers from ASCII a number... then we check if our symbol is below 'A' and return if it is (we have to subtract '0' to counter the previous change to A) if it's not, then we need to alter A, so that it's correct - we do this by subtracting the difference between 'A' and 'O', less the amount we need to add (which is Hex A) |
 |
| Beware,
we're not being very thorough with AsciiToHex... it will return
weird values for characters other than 0-F!... We're going to add more String processing functions in later lessons, as we use our text reader for more interesting things! |
|
| This is the main call routine for adding test code to our
program. Because we don't want to use any of the registers our program uses, we're going to do a little trick, and store the parameters after the call! - so a call to our dumper will look like this: call Monitor_MemDump db 33 dw &1234 Where the first byte after the call... '33' is a one-byte count of the number of bytes to dump to screen and the following word '&1234' is the address to dump from! First we get the address that called us, by swapping HL with the top of the stack pointer... next we back up all our registers... Now we read in C (bytecount) and HL (address) from the following bytes... and call our actual display routine! finally we restore the registers... and skip over the 3 bytes of parameters... last we re-swap HL with the top of the stack pointer, and all the registers will be restored the way they were before the call! |
 |
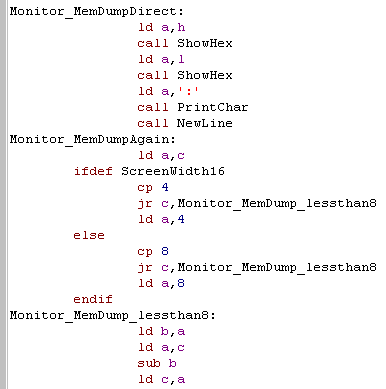
| We can Call MemDumpDirect directly
with an address in HL
and bytecount in C First we show HL to the screen as a label, so we can tell what we're viewing... Next we need to decide how many bytes to show onscreen... on TI-83 we can only show 4... but on everything else we show 8! Now we check if we have a whole line of bytes left to show, and limit the amount to show if we have more than a line left. Next we subtract the number of bytes we're going to show from the remaining count C |
 |
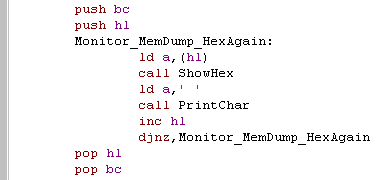
| We're ready to start displaying
it... First we show HEX, but we'll show ASCII later too, so we back up the variables in BC and HL we show each byte as a hexadecimal pair with a space afterwards (eg 'FF ')... we repeat for the count in B We've backed up HL, and BC, because we'll do the same to show the characters as ASCII |
 |
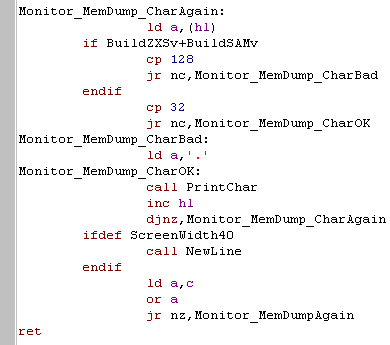
| Now we show the characters to the
screen as ASCII. Characters below 32 have special meanings, so we convert them to '.' characters to keep things working ok Also, on ZX Spectrum or Sam Coupe we can't use characters above 128 either. I've defined BuildZXSv and BuildSAMv... they will be 1 only on those systems, and 0 otherwise. IF statements on WinApe will compile lines where the condition is nonzero... by using BuildZXSv+BuildSAMv the following lines will compile if EITHER of these systems are being used. On TI, or 32 character systems, we're all done!, but on 40 character wide systems we need to do a newline... Finally we check C - and if there are any more lines to draw, we repeat the whole procedure again. |
 |
|
By adding BuildSAMv an BuildZXSv together, and using that as a condition in an IF statement, we can define a block that compiles on multiple systems... if our assembler didn't support it, we could just use a pair of IFDEF blocks, but it could get quite messy! |
Using the functions!
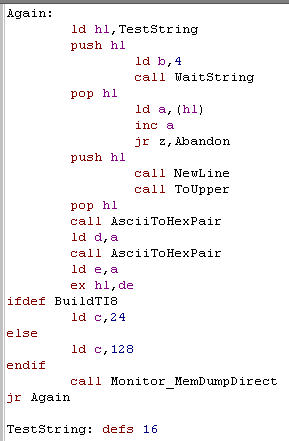
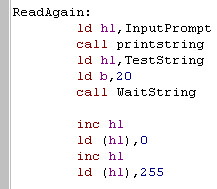
Lets test our StringReader, and Memory dump routine with a little test program... we'll read in 4 characters from the user, and dump that memory address to the screen!
| We define a buffer of 16 characters
labeled TestString for the user input (We'll actually only need 5
chars) We read in up to 4 characters using our WaitString Function (5th char is 255) Next we want to check if the first character is 255 (if the user has entered no characters)... and return if they have we do a trick here, rather than doing CP 255.. we can do INC A - if A becomes zero, it was 255... INC A saves one byte of code over CP 255... but of course A is changed in the process! Next we convert the string to Uppercase using ToUpper Then we convert the first 2 characters to hex, and store them in D Then we convert the next 2 characters to hex, and store them in E Now we swap the memory address from DE to HL On the TI we can only show 6 lines... on the everything we'll show 128.. we store this into C finally we call our MemDumpDirect routine, and repeat the whole procedure. |
 |
| One thing to note
is that the AsciiToHexPair and WaitString functions are not
restricting the keys pressed, and WaitString is not checking if
4 characters were entered... both these factors mean 'weird'
resulting memory addresses if, for example the address 'AZZZ'
was entered. Because we're only showing memory addresses, and this is only a test it doesn't really matter, but you may want to add some code to limit the keys Waitstring allows to be pressed, and check 4 characters were really entered if you want to make it better! |
|
String Functions
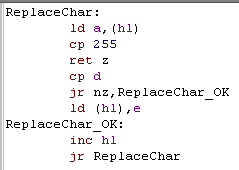
| We want to split a string up by
spaces, to do this we'll convert 'Space' (Char 32) into Char 255 This Replace char function will process the string pointed to by HL, and any characters that match register D will be swapped to E |
 |
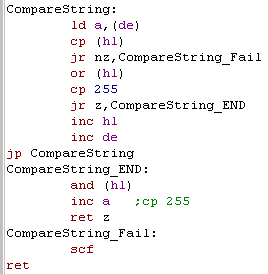
| CompareString is our other
function, We pass two string pointers, one at HL, and the other at DE... this function will set
the Carry flag if the strings don't match, and Clear it if they
do! We check each character in the strings, to see if they match, and if we find one that doesn't before BOTH strings end... then they don't match! This function doesn't check which is greater, or less than... so you'd need something else if that's what you need! SCF is Set carry flag, and this is done if the strings don't match. We load A from the string at DE... and we AND it with the character from DE... this means A will be 255 if BOTH are 255... then we do INC A, and RET Z as a quick way of checking if A is 255... also AND and OR clear the carry flag, so we don't need to do anything to clear it if the strings match |
 |
| We're going to process contents of
a user entered string, and match it to a list of words. First we'll need to define all the strings, and then we will create a table of pointers to the addresses of those strings... the list will end with &FFFF as an 'end of table' marker. Using a list of pointers will make the data neatly structured, and make things easier for us to work with! |
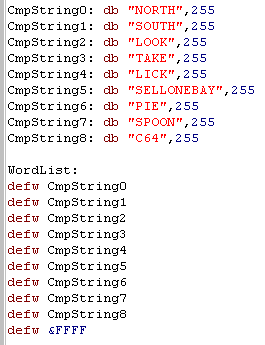 |
| Having
a
list of pointers to the strings will give us far more
flexibility... if we want to print String 2 we just set DE to 2,
and set HL to the wordlist, add DE twice, and we'll be pointing
to the word! Lists of pointers are used all the time, so while they are confusing, you'll have to try to get used to it! |
|
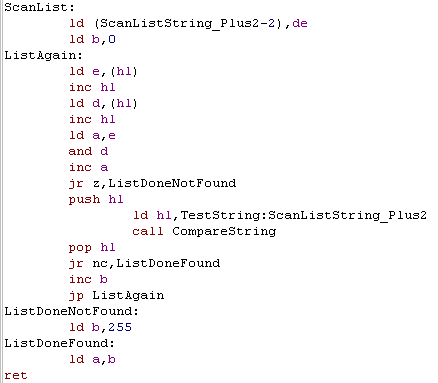
We need one more special function, it will scan this list of pointers, and return the number of the matching one, or 255 if none matched
| First we load in the address of the
next string in the list into DE. Like before, we AND both D and E together... and add one - this effectively checks if both are 255, if they are, we've no words left to check, and we never found a match. otherwise, we compare the word to the one we're searching for, and repeat if it's not found... We return the number of the match in A, but if it was never found we return 255 |
 |
|
By converting
a string to a integer, we'll be able to get assembly to process
the user's input easily! We're going to process up to two commands... so we'll be able to do things like 'North' or 'Take C64' and have the program respond to those commands! |
Reading a string, and converting it to command numbers!
| First we print a prompt to the
user, then we read up to 20 characters from the user. We're going to read in two strings, but the user may have only entered one, so for safety we add an extra 255 to the end of the string! |
 |
| We need to prepare our string, First we change all the characters to capital letters, Then we replace any spaces in the string to char 255's... this means our string code will treat it as two separate strings Finally we start a new line, we'll show the matches numerically soon! |
 |
| We now compare the user's string (TestString) with the contents
of the wordlist, and show the result with ShowHex Because we converted Spaces to Char 255, we'll only match the first word |
|
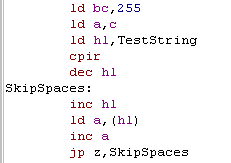
| Now we want to find the second word... this is a rare chance to
use CPIR (compare inc
repeat) We need scan up to 255 characters, so we load BC with 255.. We want to find 255 so we need A to be set to 255... we know C contains this value, so we load A with C... then we run our CPIR Now we need to check if the user has entered multiple spaces, not just one, so we check if the next char is also a 255 (using our inc a jp z trick) and skip if it is. |
 |
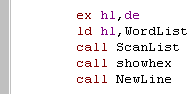
| Now we shift the starting searchpos into DE, and do another
Scan... again we show the result with ShowHex Finally we start a new line, We'll repeat the whole procedure again until the user gets bored! |
 |
|
The contents
of todays lesson may not be *That* interesting, but we're going
to extend it into the template for a little text adventure! so
tune in next week for... "Majokko Sakuya in the land of the
Chibi-Chibi's'... or something like that!... ok it's only going
to be a little 'joke game' but it'll show us how we could create
a real text adventure. |
| If
you want to see all the code, check out the Sources download, or
the video - we're only going to cover the essentials here! Why?... Because it's too complex... and you're puny mind could not take it!!!... no, actually it's because it would be long and boring... and all the source code is commented anyway! |
|
| Our game 'world' will be made up of rooms, each room will have a
description, some items we can take, and you will be able to
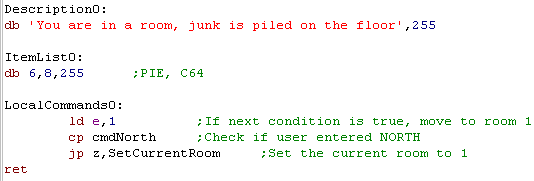
perform special actions in those rooms Each room definition is made up of three 16-bit words... Description - is the address of the string which describes the room - it will be shown to the player when they are in the room Itemlist - is the address of the items in the room, the item numbers will be one byte each, and the list ends with a 255 LocalCommands - is the address of a function which will handle the special actions a user can perform in a room |
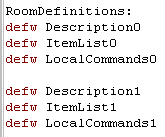 |
| The Description
is just a line of text, ending in a 255 The Itemlist contains the 'Word' numbers of the items in the room, ending in a 255 The 'LocalCommands' is a routine which will be called after 'global commands' are processed... when the function has been run, A will contain the first command number (so will B)... C will contain the second command... when the routine is called, the main loop will repeat. |
 |
|
We've only
created two rooms, but you could make as many as you want... at
least up to 255! Defining the links to the rooms is done by detecting the commands, and changing the room number... of course, you could process other local commands like 'Use Spoon' and have a special action occur in that room. |
| We need to handle items, but we also need an easy way to handle the room definitions themselves, by creating generic routines to do the work for us, we can save development time, and if we change the structure - like adding a fourth room definition - we can just modify the the generic routines, and everything else will continue to work unchanged! | |
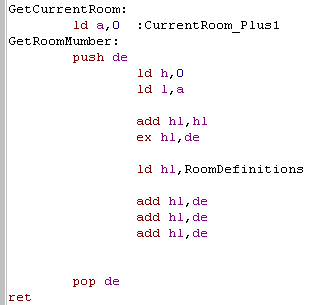
| When we want to get the data for a
room number in A, we can do this quite easily. Each room has 6 bytes of data, so we need to move 6 x A bytes... We do this by loading HL with A... doubling it, and then adding this to the start of the room Definitions... HL will then point to the address of the Description... two bytes along are the Items in the room... and four bytes along are the local commands! |
 |
| We've got various lists of items,
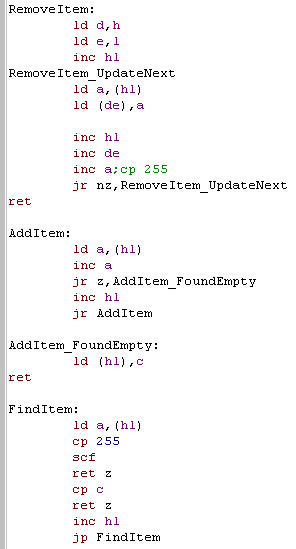
lists of items in rooms, and a list of items in our inventory. We need some commands to handle items in these lists... we need to add items to the inventory, take them out of the room, and see if an item exists when we want to take or use it. We have 3 functions to do this, RemoveItem, which will take the item pointed to by HL out the list, by scanning through the list to the end, moving each item up one, overwriting the item that was pointed to by HL Additem will find the end of the list pointed to by HL, and add the item in C to the end of the list FindItem will scan through the list pointed to by HL, and find the item C... if it's found the Carry flag will be Clear (NC)... if it's not found it will be set (C) |
 |
|
We've got all
the tools we need! Now we just need to use them to show the info
about the room, let the player take the itmes, and move around
the game world! Of course, there are many ways you could design a Text adventure, and this probably isn't the best... if you can think of a better one, go ahead an use it! |
| ArkosPlayer
and
tracker were written by Julien N�vo (Targhan)...They are
absolutely amazing, and ChibiAkumas would be nowhere near as
good as it is without them! Check out the examples in the Sources.7z download for the examples in this tutorial. ArkosOriginal.asm will show the classic ArkosPlayer... and Arkos.asm will show this tutorial's author's cut down version! (which adds Enterprise and Sam Coupe support via AY emulation) |
|
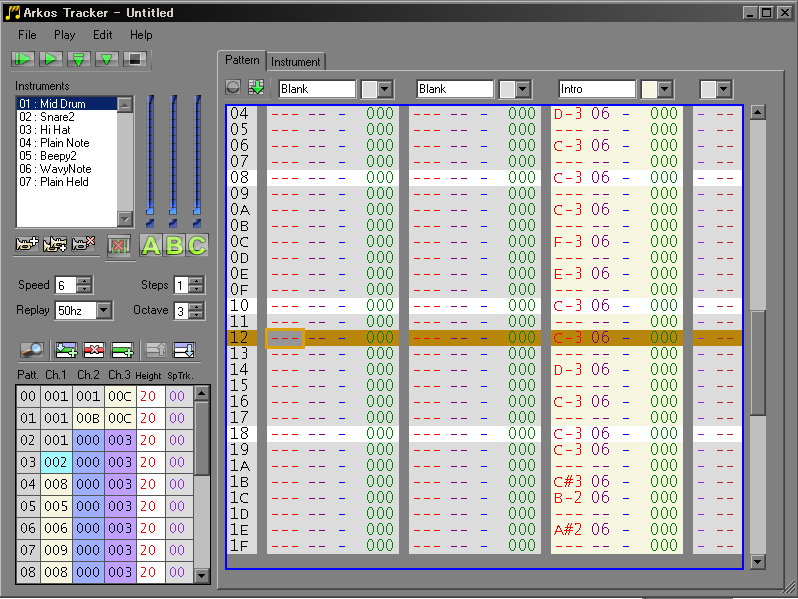
| As the name suggests, Arkostracker
looks and feels the same as the classic 90's Amiga trackers like
FastTracker, or the PC ScreamTracker. While it may look confusing, it's pretty easy to use, and with a bit of practice, you can make great 8-bit music with it. But if you don't have a musical bone in your body, Fear not!... The AKS files for this lesson are included in "ResALL\ArkosTrackerFiles" in the Sources.7z, so you can play around with those and get used to the software! |
 |
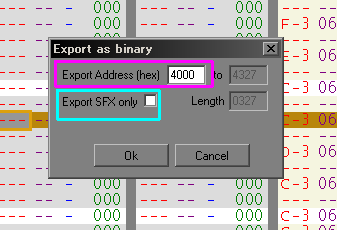
| AKS files are only for Arkostracker
editing... we need to output a binary file using the "Export as
Binary" option from the File menu ArkosPlayer files have to be loaded to the correct address in memory when we use them in our program... so when we export, we have to select the address we plan to use into 'Export Address'... if we load to a different address later, everything will go weird! There is also an 'Export SFX only' option... this exports the intstrements only for use as sound effects - you'll learn about these later. |
 |
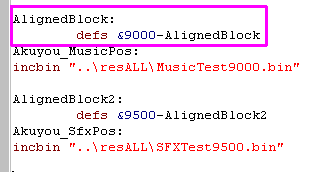
| With Sources.7z are two pre-exported files, a Music file
exported to &9000, and a SFX file exported to &9500 We need to include these in our program at the correct memory addresses. Unfortunately ORG &9000 will not work on Winape... while it will set the label addresses correctly, it will not pad the exported file with zeros (it DOES work on VASM assembler) Fortunately there's an easy solution, we define a label, then pad the output with the address we want (&9000) less the current address (AlignedBlock label), and everything will work fine! |
 |
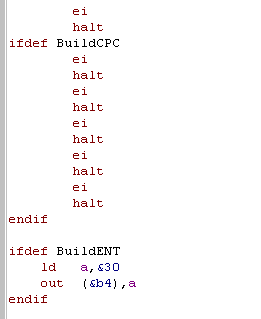
| Really we'd like to use an
interrupt handler to control timing, but we've not learned how to
do that yet... so for now we'll just fake it! We'll pause for an interrupt, then update the music - that'll keep the music playing at the correct speed without an interrupt handler. |
 |
|
That's enough
'support' code to get ArkosTracker usable, so how do we actually
make it work? First let's take a look at the 'default CPC/MSX
arkosplayer' (there is also an official Spectrum player, though
it is slightly different) |
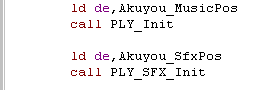
| First you need to initialize your
Music and SFX, DE must point to the correct data when you run
these commands... You MUST initialize SFX even if you don't plan to use it! Don't want SFX? Just run the INIT with DE pointing to your music! |
 |
| To update the music you just call 'PLY_Play' ... but make sure you don't run it more than 50 times a second - or your music will play too fast! |  |
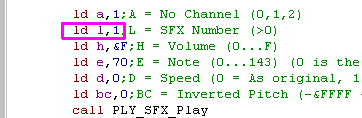
| Playing a sound effect requires
quite a few settings! the example to the right will play
instrument 1 (in
L) with default settings |
 |
|
ArkosPlayer
has lots of other features - see the code comments in
"ArkosTrackerPlayer_CPCStable_MSX.asm"... You can even use it from basic!... but we're not covering it in these tutorials! Why?... Because its an Assembly tutorial, silly! |
| That's
all it takes to get music and SFX working on ArkosPlayer! The author of these tutorials wrote a 'cut down' version... it's simpler, and adds Enterprise and Sam Coupe support!... these were made to reduce the player by every possible byte for ChibiAKumas Ep2 ... They remove the ability to use the 4th Special Track (for speed changes and Digi Drums)... and force SFX to play on the middle channel! |
|
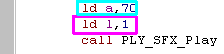
| If you're using my cut down version, you don't need to specify the address of the music and SFX, the player assumes the labels "Akuyou_MusicPos" and "Akuyou_SfxPos" point to the music! |  |
| The PLY_SFX command is different too! You can only specify the pitch and Instrument... all other options are 'default' |
 |
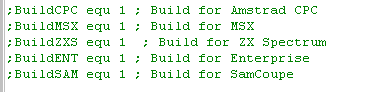
| This version of ArkosPlayer has
been modified, and works in this way on MSX, CPC,Spectrum,Sam
Coupe an Enterprise... Note Sam Coupe and Enterprise use 'AY Emulation' and will not sound quite the same! |
 |
|
The author of
these tutorials is far too stupid to write AY emulation! the
credit for the amazing Enterprise AY emulator goes to 'IstvanV'
with conversion by 'Geco'! I'm not sure who made the Sam Coupe one... it was taken from the 'Cookies Hot Butter demo'... so whoever did that kicks total ass! |
| Lesson
M6 - Advanced Interrupt handler template We just covered Interrupt Mode 2 in Lesson A2 of the Advanced series, and we covered IM1 in Lesson 7 of the Basic series. Now lets create a 'definitive' interrupt handler template, which we can use in the same way on all systems, whether they need IM1 or IM2... and we'll allow it to preserve regular registers, or shadow registers as well! Not impressed yet? well... we'll make it work even when you're misusing the stack for fast reading or writing... how about that! |
 |
 |
 |
How to use it
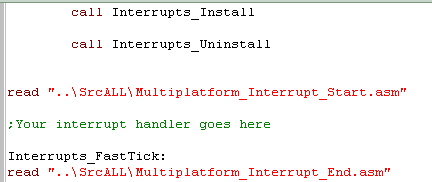
| The interrupt handler we're going
to look at this lesson does everything for us! If you don't care how it works, All you need to do is turn it on with Interrupts_Install The code you want to run each interrupt should be between the Start and End code blocks. Interrupts_FastTick is needed for the CPC... if you need something to happen at 300 hz, put it here! Use Interrupts_Uninstall when you need to restore the firmware interrupt handler! |
 |
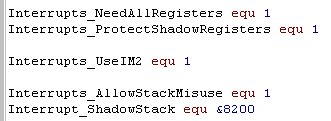
| Depending on what your interrupt handler needs, you may want to
enable some options! on systems with rom at &0038 you'll need to use IM2 If your interrupt handler needs regular registers , use 'NeedAllRegisters' If your program needs shadow registers, use 'ProtectShadowRegisters' If you're altering the stack pointer, and using it to Write or Read data, you can enable 'AllowStackMisuse' (Warning! There are restrictions) ... you'll need to provide an address for a 'Shadow Stack' which will be used by the interrupt handler |
 |
| If you're using Interrupt Mode 2, you'll need to allocate around &200 bytes of space at &8000... see Lesson A2 if you don't know why! | 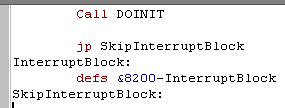 |
What does it do?
| First and foremost, the Interrupt
handler will deal with any 'oddities' of your system! On the CPC, there are 6x the normal (50 hz) number of interrupts On the MSX we need to read the VDP status register to clear the interrupt On the Enterprise |
 |
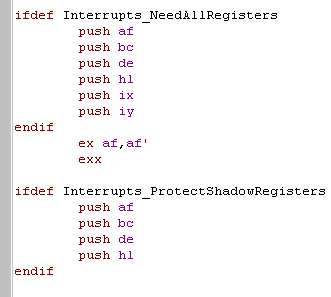
| By default it's assumed the
Shadow Registers are exclusively available for the interrupt
handler, and your interrupt handler won't need the 'normal
registers' But if that's not true (Eg: for Arkos Tracker) you can turn on Interrupts_NeedAllRegisters and Interrupts_ProtectShadowRegisters |
 |
| If you want to 'Misuse' the stack
pointer, to allow fast reading or writing, you can enable 'Interrupts_AllowStackMisuse'...
This will use a second stack during the interrupt routine called the 'Shadow Stack' meaning when an interrupt fires, only 2 bytes of the stack will be affected... it will also put whatever is in DE back at the top of the stack, replacing the 2 bytes of the address to return to after the interrupt. This means if you're careful, you can misuse the stack pointer provided the following are true: 1. If you're WRITING... there are at least 2 bytes free above the stack pointer that can be overwritten (by the first and only call to &0038... the shadow stack will be used for any pushes/calls in the interrupt handler) 2. if you're READING... all reading is done with POP DE, and DE is loaded when interrupts are first enabled. |
Interrupt Handler
Start: Interrupt Handler END: 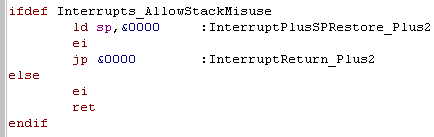 |
| Here's an example of Writing... We disable interrupts before writing the last byte pair, so that nothing will be corrupted if the interrupt fires after the last PUSH DE |
 |
| Here's an example of Reading... If you need to do any commands between enabling interrupts and the first POP DE (eg: the 3x NOP), you should preload DE with PUSH DE, POP DE... this will ensure if an interrupt fires (during the 3 NOPs) the data at the stack pointer will not be overwritten by random data already in DE |
 |
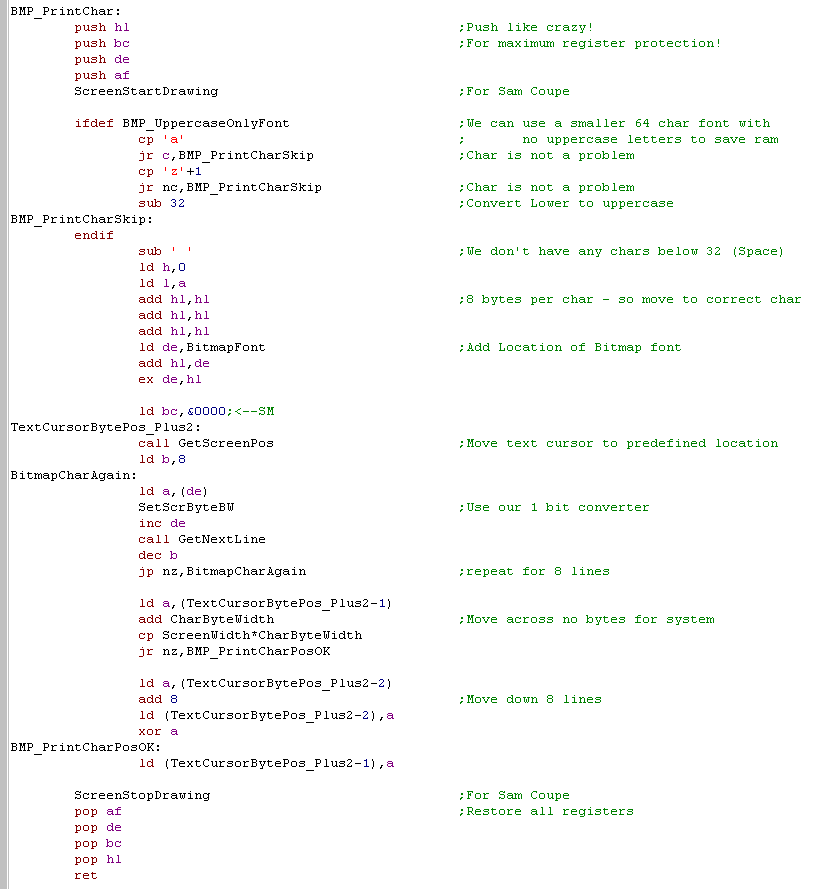
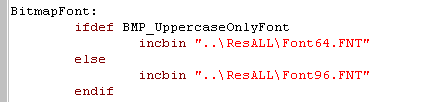
| We're going to create a bitmap font
file, the first character will be space, and it will contain 96
characters (or alternatively 64 characters with no uppercase to
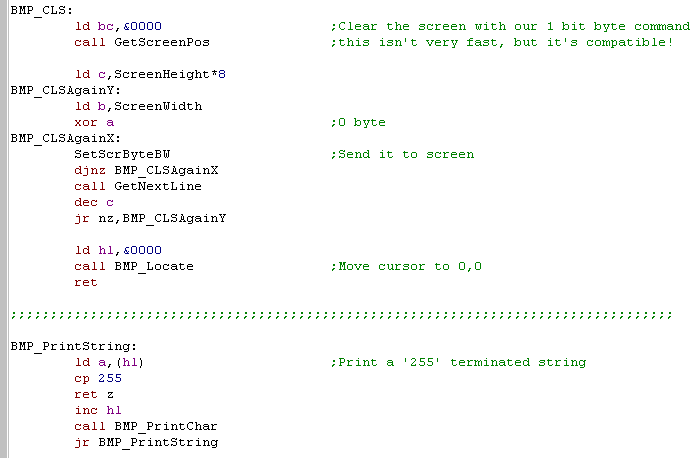
save memory) Each character will be black and white, and be 8x8, so each letter will take up 8 bytes as the first is ' ' we need to subtract 32, to get the first character in the file, then add the character number times 8 We add hl to itself 3 times to do this, then add that value to the address of the bitmap font. We then move to the screen memory location to write the bitmap data, we then write the bytes to the screen, Finally we re-position for the next character by moving across the screen, and wrapping to the next line if we've got to the end of the line |
 |
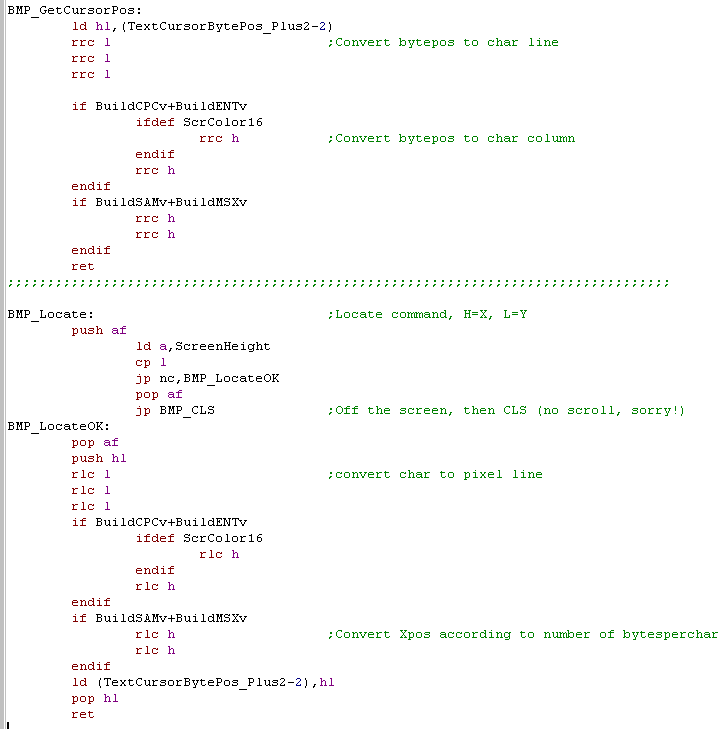
| We need to create some more
functions to do the jobs we're used to! GetCursorPos will convert the screenbyte position the next character will be written to, and covert it back to a character position like the previous 'firmware' function we used With our 'Locate' Command, we need to check first we're not off the screen, if we are, we'll clear the screen and re-position the cursor to zero if we're not, we need to alter L, multiplying it by 8 to get the correct line. We need to also alter H, multiplying it by the number of bytes the screen will use for the character. |
 |
| Our Clearscreen function is pretty
simple, we're just going to write bytes of zero to each position
on the screen using our 'SetScrByteBW' function... note, this may
be pretty slow, but it will work! If we want to be fast, we should write platform specific versions. Finally, we've defined PrintString... it's exactly the same as the last version |
 |
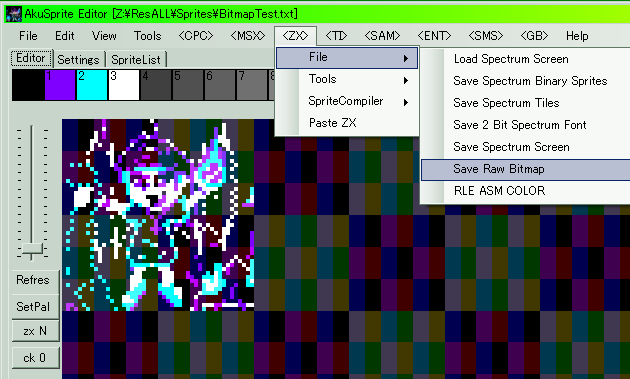
| We can convert a bitmap using my
sprite editor, we can paste an image in from the clipboard, then
export it ro a 'Raw Bitmap' with the color information converted
for the system. The AkuSprite editor (and its source code) is in the "Sources.7z" file. |
 |
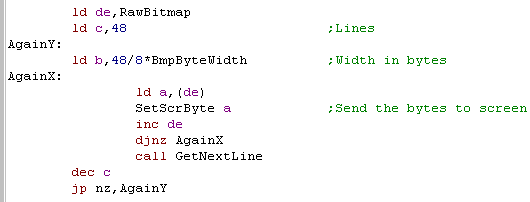
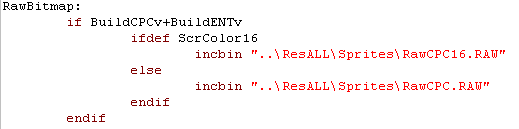
| We need to include the exported
file in our ASM, then read the bytes from the file and write them
to the screen. The file has no header, so our code needs to know how tall and wide the image is when it comes to writing it to the screen. Of course, we need different versions of the file for each system we're working with, and include them in the file (or read them from disk) The same is not true of our font file! as we're using the SetScrByteBW command ... which we made work the same on all systems, we can use the same font on all the machines! |
   |
|
AkuSprite
Editor is pretty basic at this stage, as it wasonly
developed it enough to do the conversion of ChibiAkumas, but
it's opensource, so feel free to improve it! The Author of these tutorials will try to make it better if he gets time! but don't count on it! |
Key Processing
|
Because the
hardware buttons are in a fairly 'random' order we cannot tell
what letter key each button is... but to solve this we have
defined a 'keymap'... as the keymap matches the hardware layout,
we can detect letter buttons (and other buttons like shift or
control - if we want) and convert them to a letter or
'universal' (across all our platforms) keycode |
| We've previously defined the layout of the keys compared to the hardware, so now we can use it to process the key presses, and convert them to letters and buttons. | 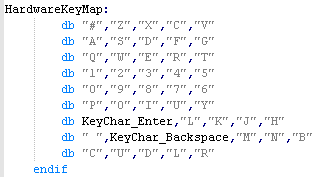 |
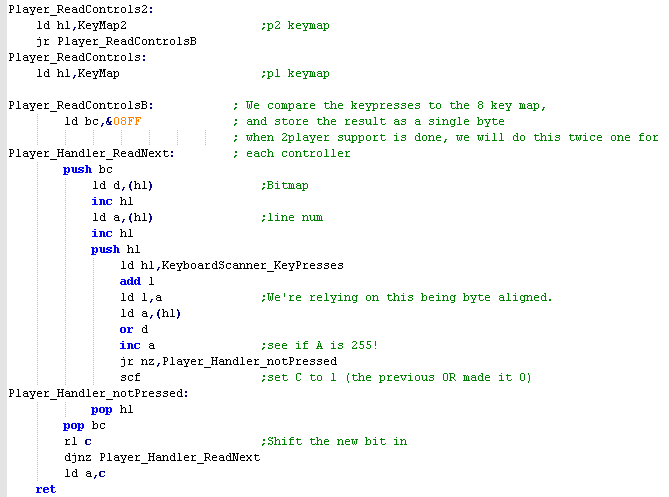
| Most systems have 8 bits per line,
but the speccy has only 5... we define 'LineWidth' to the correct
number of bits. We then point HL to our buffer, and DE to the keymap. To actually find the letter key that was pressed we repeatedly pop one bit off the buffer for each byte in the Hardware Key Map... when we find a bit that is 0, we just return the matching character byte from the keymap. If we don't get a match, we return 0... of course, this can't handle multiple key presses at the same time. |
 |
| We have an easy 'read one character' command... where we wait until a key is pressed, and pause a while so the repeat doesn't happen too fast. | 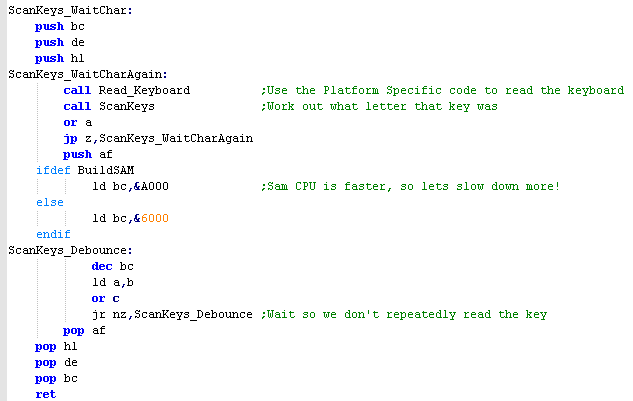 |
Joystick (and keycontroller) Processing
|
Because all
the Key and Joystick devices are being converted into a common
buffer (whatever the system) we can now allow the user to
redefine their controls, and process the resulting 'joy/key map'
in a common way via a single 'Button map' byte... there's one
for each player, so we support 2 players... You could support more... but keyclash will probably stop you! |
| We use 2 defined keymaps, one for
player 1, and a second (16 bytes later) for player 2... Each one contains 8 pairs of a bitmask and a row number... they are compared to the keypress buffer we filled before. |
 |
| When we want to read in the
keypresses, we set B to the number of lines we want to read in
(always 8), C is used to store the result. We process each line in the keymap, reading the bitmask into D, then we actually look at the keypresses of the matching line, and OR in the bitmask in D if the result is not 255.. then the matching key has been pressed, and we set the carry flag. Finally we rotate C to the left, and repeat. |
 |
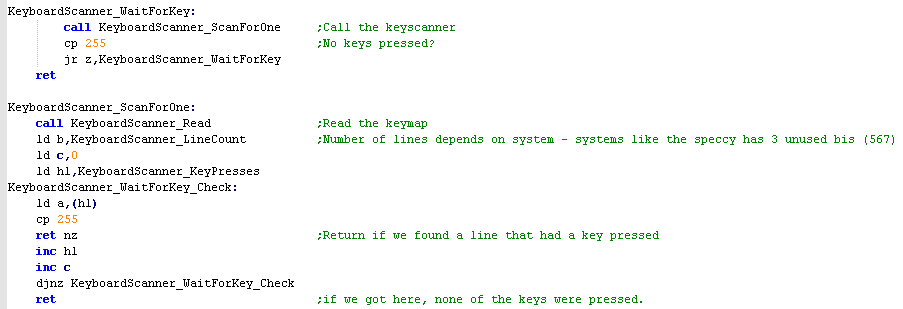
Configuring keys
| For reading in the input devices,
we first want to define a new 'wait for key' function... this will
be used for our redefine keys function. We also have a 'Scan for one' command that will will wait for the user to press a key, it returns the bitmap of the pressed key, and line number in C |
 |
| We need a set of text definitions for the keypresses to prompt the user, a set of ordered pointers to the strings, and the strings themselves | 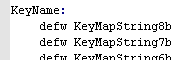  |
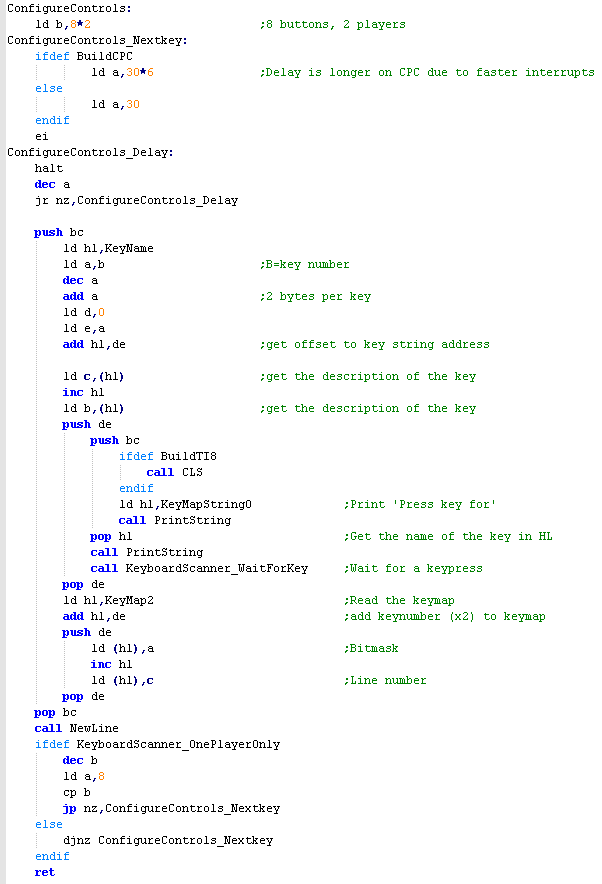
| Allowing the user to redefine the keys is pretty easy... First we show one of the strings for the key we want in the keymap... Next we use the 'WaitForKey' function we defined earlier, as this returns a line number in C and bitmask in A, we can just store the key the user pressed into the keymap, and repeat for the next key... The keymap will be in the required format for the 'ReadControls function |
 |
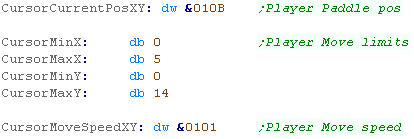
Memory Data Storage and Main Loop code
| We're going to need some temp vars for our 'Cursor'
Routine...this will handle player movement We'll need 2 bytes for the Current Position (CursorCurrentPosXY) We'll need 4 bytes to specify the range the cursor can move (CursorMinX, CursorMaxX, CursorMinY, CursorMaxY) We'll also use 2 bytes called 'CursorMoveSpeedXY'... If we want to move faster than 1 unit per button press, we can change this value to do so! |
 |
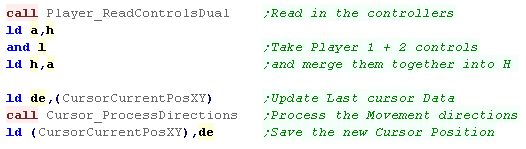
| When we want to update the player position, in our game loop we
need to load in the players keypress bitmask into H (we'll combine
player 2's in as well) Our routine 'Cursor_ProcessDirections' will use H for it's keypresses... and DE for the player position.... the new player position will be returned in DE after the routine |
 |
| We'll also define the bits of the H register - each bit relates to a joystick direction, but we'll define them as symbols to make things clearer! |  |
Processing the Joystick - Down
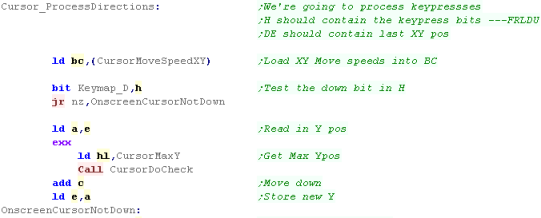
| Here is the code which will actually handle the keypresses! First we'll read in the move speed into BC, B will contain the X move speed, and C will be the Y move speed ... in this case both will just be 1 - as we'll move 1 unit as a time. We'll use the BIT command with the H register and the symbol Keymap_D - this will be 1 (nonzero) if the button is not pressed down... if that's the case we'll skip to OnscreenCursorNotDown If the button IS down, then we need to check if the player is already at the bottom of the screen area, We need to load the current Y position from E into the Accumulator... next we use EXX to swap to the shadow registers - we need to use HL, and don't want to replace the joystick buttons in H Now we load in the maximum boundary's memory address into HL... CursorMaxY is the address of the byte parameter we want to check... we call CursorDoCheck - we'll look at that in a moment... CursorDoCheck will cancel the update if we're already over the limit (it also does another EXX) - so if we're still running then we need to move down - we do this by adding C to the accumulator and saving it back to E |
 |
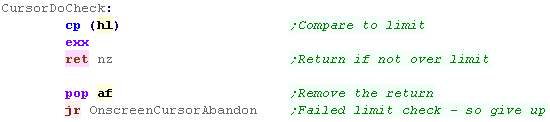
| CursorDoCheck will compare A to the data in the address HL... It will then use EXX to restore the non shaow registers If the cursor is not on the boundary it will return - if it IS on the boundary, it will pop two bytes off the stack (meaning the code will not return to the calling address) and then returns... because we popped off the old return address, this has the effect of abandoning Cursor_ProcessDirections |
 |
|
The
CursorDoCheck code could be built into the main routine, but
it's been split out o save some bytes. This code was originally used in the menus of ChibiAkumas, but it's been improved and re-purposed for a new game that's in progress! |
Processing the Joystick - Up, Left and Right
| We need to repeat the same kind of procedure for the other directions, just with different registers, and addresses for the boundary variables | 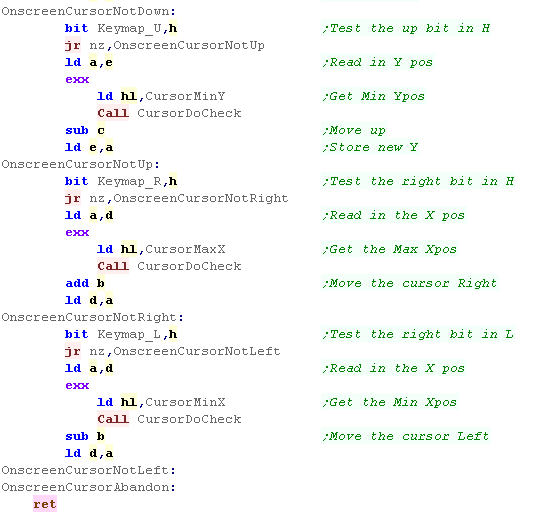 |
| This
routine is rather simplistic, but it works, and it's easy to
reconfigure - so you can use it for various purposes... If you change the X or Y speed to Zero, you can disable one of the Axis - so (for example) you can use it to control an onscreen 'spinner' |
|
| Lets see the whole main loop! Once we've processed the joystick, we need to actually show the 'paddle' on the screen, we'll use a routine called "DrawPaddle" which will use 4 'X' characters in a vertical strip to show our 'paddle' The same routine will do the erasure of the paddle, we'll erase the paddle before processing the Joypad, and then draw the paddle again afterwards... We need to pause a while before repeating the process, or the paddle will flicker! |
 |
| Lesson
M10 - Making a PONG - Part 2 Lets continue with the pong - we need a ball, a CPU player, and some collision detection and the like... Let's finish the job!! |
|
|
|
Send More Variables!
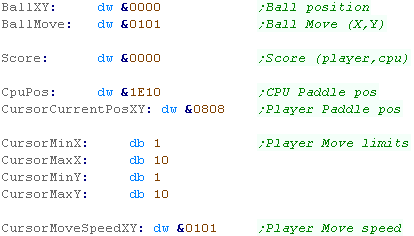
| We're going to need more variables now we've got a CPU player
and a Ball The CPU Player will need a 2 byte XY position (CpuPos) The Ball will need an XY position (BallXY) and also a Moving direction (BallMove)... both will be two bytes, one for X and one for Y We'll also need a score (Score)- the first byte will be player 1, and the second will be player 2 |
 |
The Main Loop
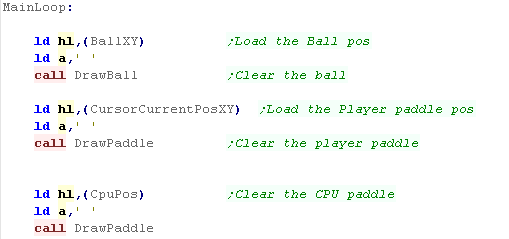
| The start of the main loop needs to
clear the two paddles, and the ball We'll use the paddle routine we saw last time, and a 'ball drawing routine' to clear the ball |
 |
 |
Moving the CPU
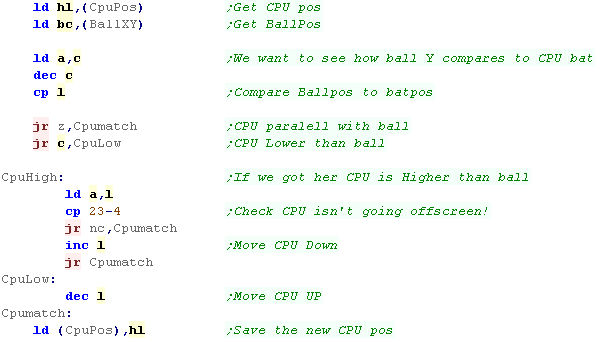
| We need to make the CPU aim for the ball... The CPU's going to be pretty dumb, if the ball is above the cpu, it'll move up... if it's below, it'll move down. We load the CPU position into HL, and the Ball position into BC we compare the two - but since the bat is 4 characters tall, we add one to the Ypos of the ball, to aim for something like the middle... if the ball is above the CPU we move up... if the ball is below the CPU, we check if the CPU can move down.. The screen Y co-ordinates is 0-23... but the bat is 4 characters talll... so we have to subtract 4 when we do the compare... We update the Ypos to the new position by increasing or decreasing L, then we save the new position |
 |
|
You won't have
much trouble outsmarting the CPU - but it's only an example...
feel free to make it smarter if you want! |
Processing the Joystick
| The joystick code is the same as last time |  |
Moving the ball
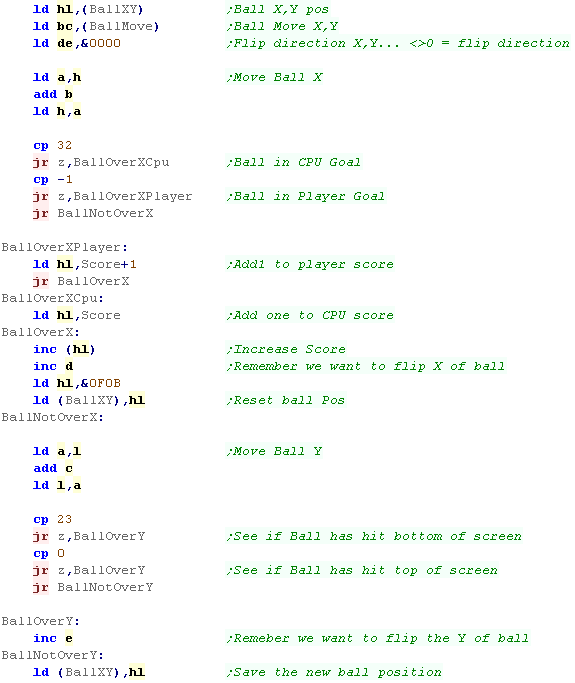
| We need to move the ball... We'll load the ball position into HL... The XY 'change' (the amount added/subtracted from the ball position) is in BC DE is the XY 'flip' - we'll change this from zero if the ball direction needs to change We update the Xpos first, and we see if the ball has gone into a goal... if it has, we give the other player a point and reset the ball position... we'll need to flip the X direction, so we INC D to remember this We then update the Y position, if the ball has hit the top or bottom of the screen we'll need to flip the Y direction, so we INC E to remember this Finally we update the ball position in BallXY |
 |
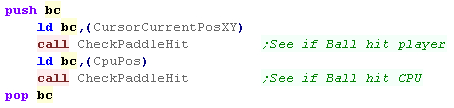
| We need to compare to the player and computer paddles, to do
this, we load the XY of one of the paddles, and call
CheckPaddleHit to see if the hit occurred |
 |
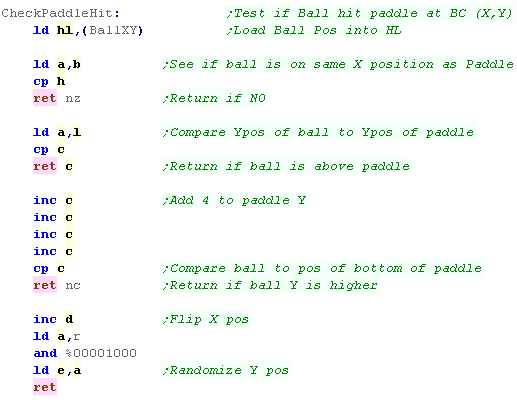
| When the CheckPaddleHit routine is
called, BC will contain the position of the top of the paddle... We load BC with the position of the ball so we can compare... First we check the ball and the paddle and see if they have the same X position... if they're not the same, then the ball hasn't hit the paddle Next we see if the ball is above the paddle... if it is, then it's not hit the paddle The paddle is 4 characters tall, so we add 4 to the paddle Y position, and see if result is greater than the paddle position... if it is, then the ball is lower than the paddle. If we've not returned then we need to flip the paddle... we INC D to flip the X move of the ball, and we use a bit of the R register as a random source for the E register - to maybe flip the Y move of the ball |
 |
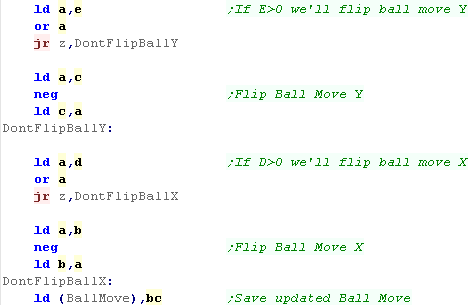
| Once the subroutine has been
called, we look at D and E if E is greater than zero, we flip C to cause the ball to move in the opposite Y direction if D is greater than zero, we flip B to cause the ball to move in the opposite X direction Finally we save the new ball direction |
 |
| Remember... the
co-ordinate in the Player and CPU XY are the top of the
paddle... Any time we need to consider the bottom we need to add 4 - if you want to work with a different paddle height, you'll have to reprogram the code! |
|
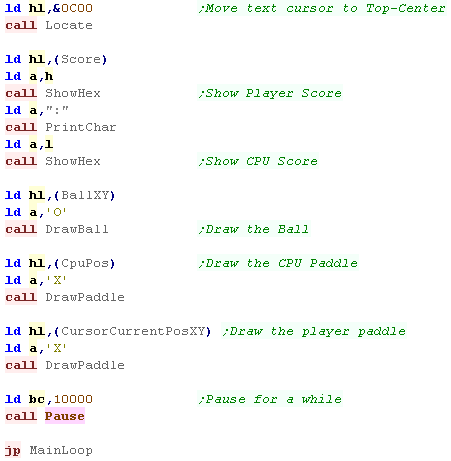
| We're going to draw all the screen
stuff! First we set the cursor position to the top center, and show the two scores with a colon between them. Next we draw the ball, and then we draw the CPU and Player paddle... Notice the CPU and Player paddles and the ball are drawn with the same subroutines that cleared them at the start Finally we pause for a while, then repeat the main loop! |
 |
|
This example
will on the CPC, Speccy and most of the other Z80 computers - it
doesn't work yet on the consoles... this is because it has been
kept as simple as possible for the person who requested it -
adding support for GBZ80 and smaller screens makes things more
complex... And alternative version, called 'PONG2.ASM' will work on the SMS/GG and even Gameboy! |
| View Options |
| Default Dark |
| Simple (Hide this menu) |
| Print Mode (white background) |
| Top Menu |
| ***Main Menu*** |
| Youtube channel |
| Patreon |
| Introduction to Assembly (Basics for absolute beginners) |
| Amazon Affiliate Link |
| AkuSprite Editor |
| ChibiTracker |
| Dec/Bin/Hex/Oct/Ascii Table |
| Alt Tech |
| Archive.org |
| Bitchute |
| Odysee |
| Rumble |
| DailyMotion |
| Please note: I wlll upload more content to these alt platforms based on the views they bring in |
| 68000 Content |
| ***68000 Tutorial List*** |
Learn 68000 Assembly  |
| Hello World Series |
| Platform Specific Series |
| Simple Samples |
| Grime 68000 |
| 68000 Downloads |
| 68000 Cheatsheet |
| Sources.7z |
| DevTools kit |
| 68000 Platforms |
| Amiga 500 |
| Atari ST |
| Neo Geo |
| Sega Genesis / Mega Drive |
| Sinclair QL |
| X68000 (Sharp x68k) |
| 8086 Content |
| Learn 8086 Assembly |
| Platform Specific Series |
| Hello World Series |
| Simple Samples |
| 8086 Downloads |
| 8086 Cheatsheet |
| Sources.7z |
| DevTools kit |
| 8086 Platforms |
| Wonderswan |
| MsDos |
| ARM Content |
| Learn ARM Assembly |
| Learn ARM Thumb Assembly |
| Platform Specific Series |
| Hello World |
| Simple Samples |
| ARM Downloads |
| ARM Cheatsheet |
| Sources.7z |
| DevTools kit |
| ARM Platforms |
| Gameboy Advance |
| Nintendo DS |
| Risc Os |
| Risc-V Content |
| Learn Risc-V Assembly |
| Risc-V Downloads |
| Risc-V Cheatsheet |
| Sources.7z |
| DevTools kit |
| MIPS Content |
| Learn Risc-V Assembly |
| Platform Specific Series |
| Hello World |
| Simple Samples |
| MIPS Downloads |
| MIPS Cheatsheet |
| Sources.7z |
| DevTools kit |
| MIPS Platforms |
| Playstation |
| N64 |
| PDP-11 Content |
| Learn PDP-11 Assembly |
| Platform Specific Series |
| Simple Samples |
| PDP-11 Downloads |
| PDP-11 Cheatsheet |
| Sources.7z |
| DevTools kit |
| PDP-11 Platforms |
| PDP-11 |
| UKNC |
| TMS9900 Content |
| Learn TMS9900 Assembly |
| Platform Specific Series |
| Hello World |
| TMS9900 Downloads |
| TMS9900 Cheatsheet |
| Sources.7z |
| DevTools kit |
| TMS9900 Platforms |
| Ti 99 |
| 6809 Content |
| Learn 6809 Assembly |
| Learn 6309 Assembly |
| Platform Specific Series |
| Hello World Series |
| Simple Samples |
| 6809 Downloads |
| 6809/6309 Cheatsheet |
| Sources.7z |
| DevTools kit |
| 6809 Platforms |
| Dragon 32/Tandy Coco |
| Fujitsu FM7 |
| TRS-80 Coco 3 |
| Vectrex |
| 65816 Content |
| Learn 65816 Assembly |
| Hello World |
| Simple Samples |
| 65816 Downloads |
| 65816 Cheatsheet |
| Sources.7z |
| DevTools kit |
| 65816 Platforms |
| SNES |
| eZ80 Content |
| Learn eZ80 Assembly |
| Platform Specific Series |
| eZ80 Downloads |
| eZ80 Cheatsheet |
| Sources.7z |
| DevTools kit |
| eZ80 Platforms |
| Ti84 PCE |
| IBM370 Content |
| Learn IBM370 Assembly |
| Simple Samples |
| IBM370 Downloads |
| IBM370 Cheatsheet |
| Sources.7z |
| DevTools kit |
| Super-H Content |
| Learn SH2 Assembly |
| Hello World Series |
| Simple Samples |
| SH2 Downloads |
| SH2 Cheatsheet |
| Sources.7z |
| DevTools kit |
| SH2 Platforms |
| 32x |
| Saturn |
| PowerPC Content |
| Learn PowerPC Assembly |
| Hello World Series |
| Simple Samples |
| PowerPC Downloads |
| PowerPC Cheatsheet |
| Sources.7z |
| DevTools kit |
| PowerPC Platforms |
| Gamecube |
| Work in Progress |
| ChibiAndroids |
| Misc bits |
| Ruby programming |
Buy my Assembly programming book
on Amazon in Print or Kindle!


Available worldwide!
Search 'ChibiAkumas' on
your local Amazon website!
Click here for more info!


Buy my Assembly programming book
on Amazon in Print or Kindle!
Available worldwide!
Search 'ChibiAkumas' on
your local Amazon website!
Click here for more info!
Buy my Assembly programming book
on Amazon in Print or Kindle!
Available worldwide!
Search 'ChibiAkumas' on
your local Amazon website!
Click here for more info!
Buy my Assembly programming book
on Amazon in Print or Kindle!
Available worldwide!
Search 'ChibiAkumas' on
your local Amazon website!
Click here for more info!
Buy my Assembly programming book
on Amazon in Print or Kindle!
Available worldwide!
Search 'ChibiAkumas' on
your local Amazon website!
Click here for more info!
Buy my Assembly programming book
on Amazon in Print or Kindle!
Available worldwide!
Search 'ChibiAkumas' on
your local Amazon website!
Click here for more info!
Buy my Assembly programming book
on Amazon in Print or Kindle!
Available worldwide!
Search 'ChibiAkumas' on
your local Amazon website!
Click here for more info!
Buy my Assembly programming book
on Amazon in Print or Kindle!
Available worldwide!
Search 'ChibiAkumas' on
your local Amazon website!
Click here for more info!
Buy my Assembly programming book
on Amazon in Print or Kindle!
Available worldwide!
Search 'ChibiAkumas' on
your local Amazon website!
Click here for more info!
Buy my Assembly programming book
on Amazon in Print or Kindle!
Available worldwide!
Search 'ChibiAkumas' on
your local Amazon website!
Click here for more info!
Buy my Assembly programming book
on Amazon in Print or Kindle!
Available worldwide!
Search 'ChibiAkumas' on
your local Amazon website!
Click here for more info!